Introduction
Alright, let's talk electricity and magnetism. Every time you charge your phone, flick a light switch, or feel a static shock off a doorknob, this chapter is running in the background. It's the biggest topic in Core Physics and easily the most useful one for real life, because basically everything that plugs in or runs on a battery obeys these rules. We're going to go from invisible charges and magnetic fields all the way to circuits, household wiring, motors, and the transformers humming on the power lines outside. By the end you'll be reading circuit diagrams like song lyrics and explaining why a bird on a power line doesn't get fried. Let's power up! ⚡
Magnets, Poles and Field Lines4.1
Every magnet has a north pole and a south pole, and the golden rule is like poles repel, unlike poles attract. The space around a magnet where it can push or pull is the magnetic field, and we draw it with field lines that always point from north to south outside the magnet. Where the lines are close together the field is strong (right at the poles); where they spread out it's weak. Magnetic materials are iron, steel, cobalt and nickel; everything else (copper, plastic, wood) is non-magnetic. You can turn a piece of unmagnetised iron into a temporary magnet just by bringing a magnet near it: that's induced magnetism, and it's why a magnet picks up a chain of paper clips. 🧲
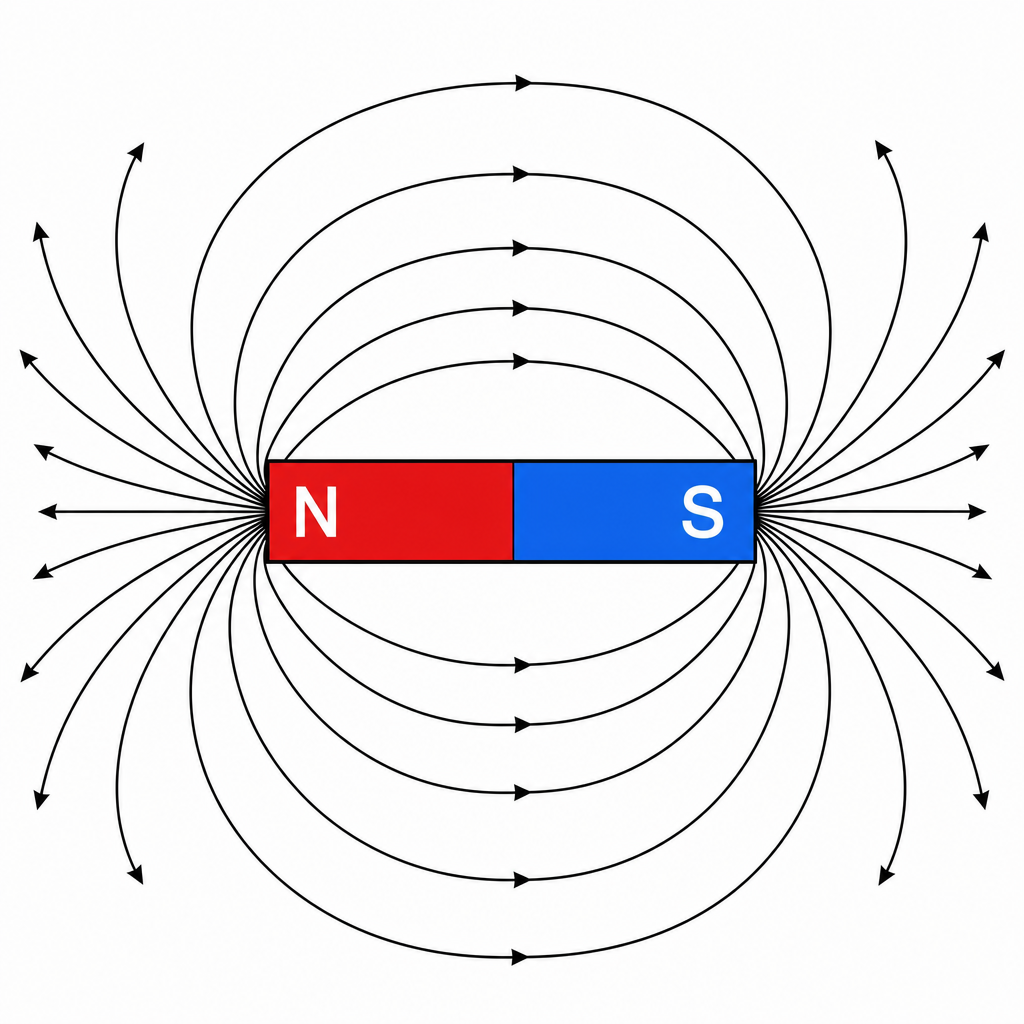
> 🔑 Key idea: Like poles repel, unlike attract. Field lines run N → S outside the magnet; closer lines = stronger field.
Worked Example: Spotting the Real Magnet4.1
Problem You have two identical steel bars. One is a magnet, one is just plain steel. Without any other equipment, how can you tell which is which?
Step 1 Bring one end of bar A near the middle of bar B. A magnet's poles are at its ends and its middle is a "weak spot", so if there's a point on a bar where the other bar feels no pull, that bar is the magnet. The decisive test is repulsion: only a magnet can repel the other bar, because induced magnetism can only ever attract. If you ever feel a push, the bar you're holding is the magnet.
Static Charge: Where Electricity Begins4.2.1
There are two kinds of electric charge, positive and negative, and just like magnets, like charges repel and unlike charges attract. You create static charge by rubbing (friction): drag a plastic rod through a cloth and electrons (tiny negative charges) get scraped off one and onto the other. The one that gains electrons becomes negative; the one that loses them becomes positive. Only electrons move, never the positive charges. Materials split into conductors (metals, which let charge flow freely because they have loose electrons) and insulators (plastic, rubber, glass, which trap charge in place). That trapped charge is exactly why you build up a zap walking across a carpet and discharge it into the next metal handle you touch. ⚡
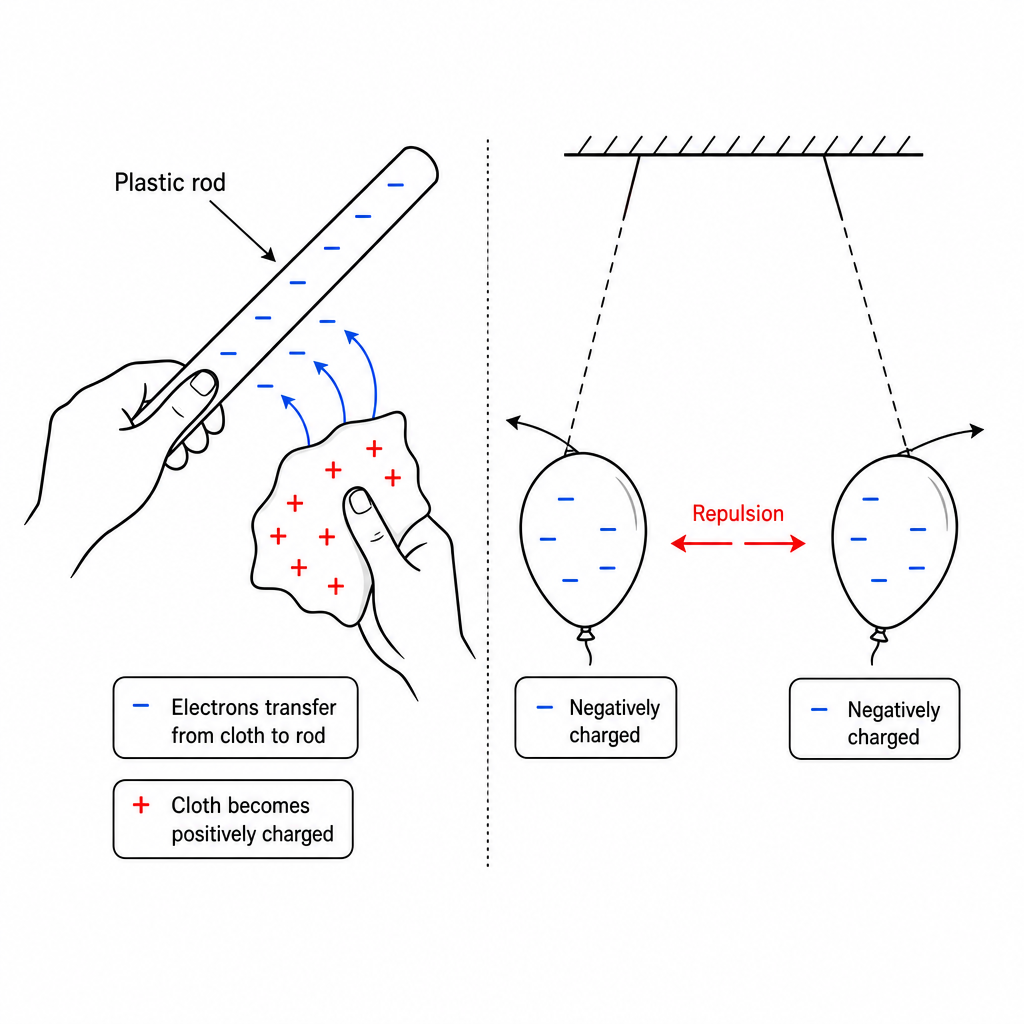
> 🔑 Key idea: Charging by friction moves electrons only. Like charges repel, unlike attract. Conductors let charge flow; insulators trap it.
Worked Example: The Repelling Balloons4.2.1
Problem You rub two balloons on your hair and hang them side by side on threads. They swing apart. Explain why.
Step 1 Rubbing transfers electrons from your hair onto both balloons, so each balloon gains the same (negative) charge. Like charges repel, so the two negatively charged balloons push each other away and the threads hang at an angle.
Electric Current: Charge on the Move4.2.2
Current is the rate at which electric charge flows past a point, measured in amperes (A) with an ammeter connected in series (in the line of the circuit). It's defined by
$$I = \frac{Q}{t}$$
where $Q$ is charge in coulombs (C) and $t$ is time in seconds. In a metal, the moving charges are electrons, but by an old convention we draw conventional current flowing from + to − around the circuit (electrons actually drift the other way: don't let it trip you up). Current comes in two flavours: direct current (d.c.) from batteries always flows one way, while alternating current (a.c.) from the mains keeps swapping direction many times a second. 🔋
> 🔑 Key formula: $I = \dfrac{Q}{t}$, measured in amps with an ammeter in series. Conventional current flows + → −; d.c. is one-way, a.c. swaps direction.
Worked Example: Counting the Charge4.2.2
Problem A torch bulb carries a current of $0.50$ A for $30$ seconds. How much charge passes through it?
Step 1 Rearrange $I = Q/t$ to get $Q = I \times t = 0.50 \times 30 = 15$ C. So $15$ coulombs of charge flow through the bulb.
E.m.f. and Potential Difference: The Push4.2.3
Charge doesn't move on its own: something has to push it, and that push is voltage, measured in volts (V) with a voltmeter connected in parallel (across the component). There are two voltage words to keep straight. Electromotive force (e.m.f.) is the energy a battery or generator gives to each unit of charge it pushes out: it's the "full strength" of the source. Potential difference (p.d.) is the energy delivered to each unit of charge as it passes through a component, like a bulb or resistor. Same unit (volts), different jobs: e.m.f. is energy in, p.d. is energy spent. Think of the battery as a water pump giving energy to the water, and each component as a waterwheel taking energy back out. 💡
> 🔑 Key idea: Voltage is the push, measured in volts with a voltmeter in parallel. E.m.f. = energy given per unit charge by the source; p.d. = energy delivered per unit charge to a component.
Worked Example: Voltmeter in the Right Place4.2.3
Problem A student wants to measure the p.d. across a lamp. Where should the voltmeter go, and how is that different from the ammeter?
Step 1 A voltmeter measures the difference between two points, so it goes in parallel, connected across the two ends of the lamp. The ammeter measures flow through the lamp, so it goes in series, in the line of the circuit. Voltmeter across, ammeter along.
Resistance and Ohm's Law4.2.4
Resistance is how much a component opposes the flow of current, measured in ohms (Ω). The defining relationship links voltage, current and resistance:
$$R = \frac{V}{I} \quad\Longleftrightarrow\quad V = IR$$
So for the same push, a bigger resistance means a smaller current. You measure resistance by putting an ammeter (in series) and a voltmeter (in parallel) around the component, then dividing $V$ by $I$. Resistance also depends on the wire itself: a longer wire has more resistance (more obstacles for the charge to pass), and a thicker (larger cross-section) wire has less resistance (more lanes for the traffic). That's why long thin wires get warm and short fat ones don't. 🚦
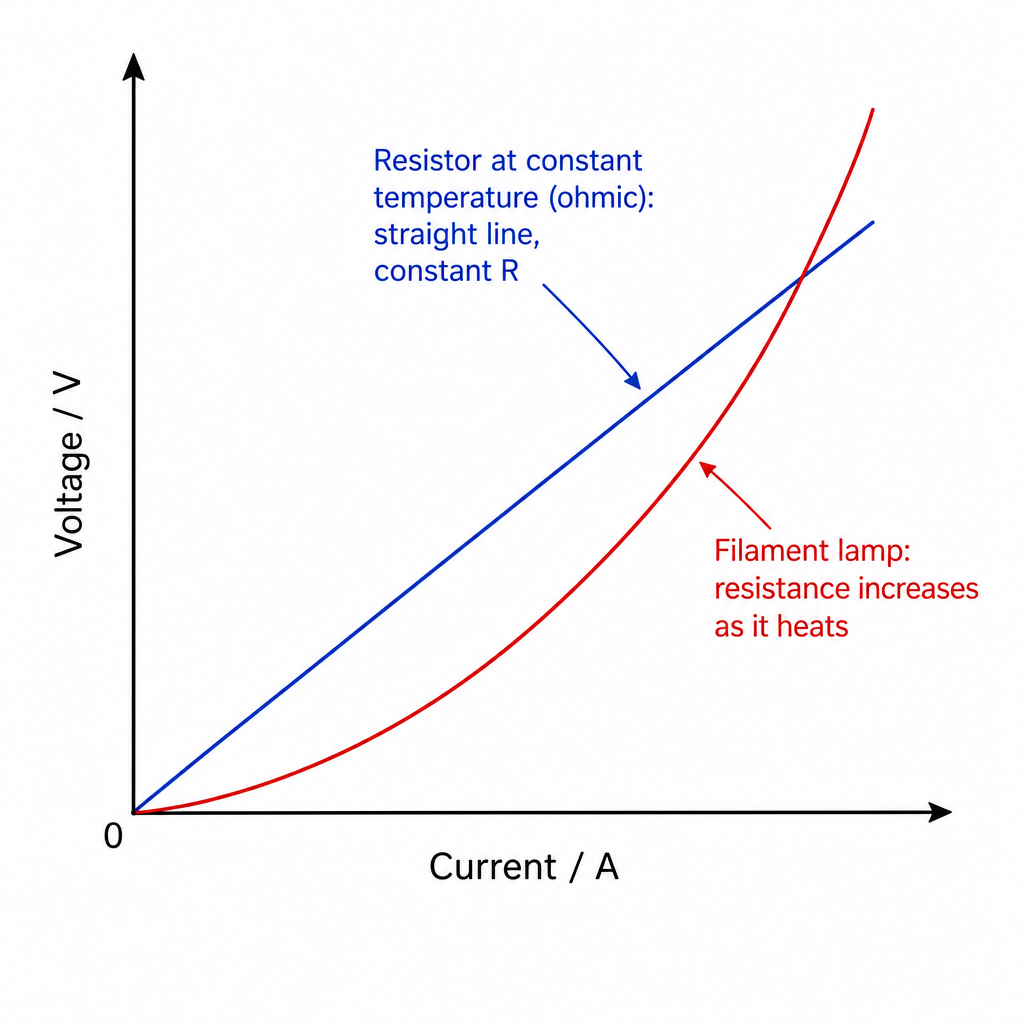
> 🔑 Key formula: $V = IR$ (so $R = V/I$), in ohms. Longer wire → more resistance; thicker wire → less resistance.
Worked Example: Sizing a Resistor4.2.4
Problem A component has a current of $0.40$ A flowing through it when the p.d. across it is $6.0$ V. Find its resistance. Then work out the current if the voltage is raised to $12$ V (assume the resistance stays the same).
Step 1 Write the equation and rearrange for resistance: $R = \dfrac{V}{I} = \dfrac{6.0}{0.40} = 15\ \Omega$.
Step 2 Now use $V = IR$ rearranged for current at the new voltage: $I = \dfrac{V}{R} = \dfrac{12}{15} = 0.80$ A.
Step 3 Doubling the voltage from $6.0$ V to $12$ V doubled the current from $0.40$ A to $0.80$ A, exactly what $V = IR$ predicts when $R$ is fixed. That straight-line, double-the-push-double-the-flow behaviour is what makes a resistor ohmic.
Electrical Energy and Power4.2.5
Power is the rate at which a device transfers electrical energy, measured in watts (W). In a circuit it's the voltage times the current:
$$P = IV$$
and over a time $t$ the energy transferred is $E = IVt$ (in joules). A higher-power device (a kettle, a heater) pulls a bigger current at the same voltage and chews through energy faster. For your electricity bill, joules are far too small, so energy companies bill in kilowatt-hours (kWh): one kWh is the energy a $1$ kW device uses in one hour. The cost is just $\text{kWh} \times \text{price per unit}$. That's why running a $2$ kW heater all evening shows up on the bill while charging a phone barely registers. 💸
> 🔑 Key formula: $P = IV$ and $E = IVt$. Energy bills use kilowatt-hours: $\text{cost} = \text{power (kW)} \times \text{time (h)} \times \text{price per kWh}$.
Worked Example: Rating the Kettle4.2.5
Problem A kettle is rated $2300$ W and runs from the $230$ V mains. (a) What current does it draw? (b) If electricity costs $30$p per kWh, what does it cost to run the kettle for $6$ minutes ($0.10$ h)?
Step 1 Rearrange $P = IV$ for current: $I = \dfrac{P}{V} = \dfrac{2300}{230} = 10$ A. That's why kettles need a $13$ A fuse, not a $3$ A one.
Step 2 Energy used $= 2.3 \text{ kW} \times 0.10 \text{ h} = 0.23$ kWh.
Step 3 Cost $= 0.23 \text{ kWh} \times 30\text{p} = 6.9$p. A few pence per cuppa, mostly because the kettle is high-power but only runs for minutes.
Circuit Diagrams and Symbols4.3.1
A circuit diagram is a tidy map of a real circuit drawn with standard symbols, so anyone in the world can read it. You need to recognise and draw the symbols for a cell and battery, a switch, a lamp, a resistor and variable resistor, an ammeter (A in a circle) and voltmeter (V in a circle), plus a fuse, a diode, an LED, a thermistor and an LDR (light-dependent resistor). A few behave specially: a diode only lets current flow one way; a thermistor's resistance drops as it heats up; an LDR's resistance drops in bright light. Drawing components in a neat rectangle with straight wires and right-angle corners is the exam-friendly style. 🗺️
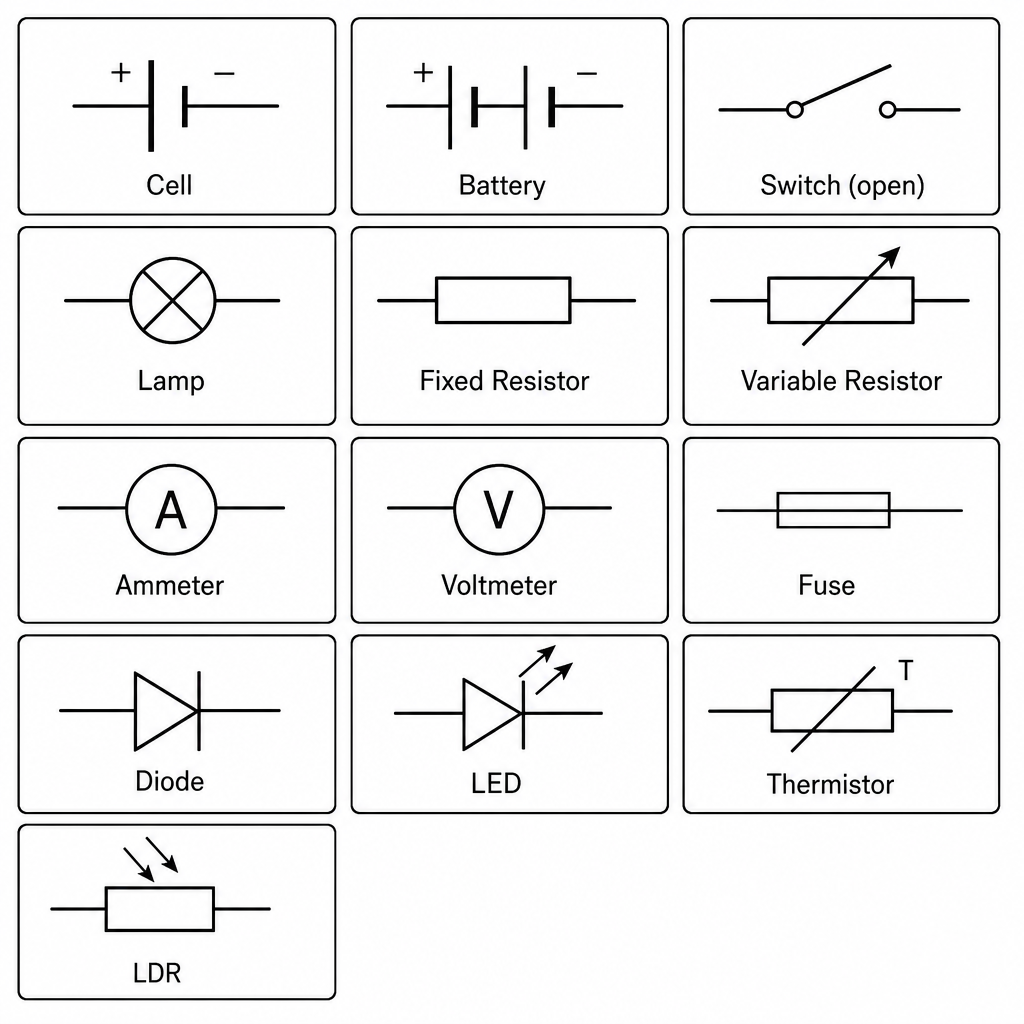
> 🔑 Key idea: Learn the standard symbols. Special components: diode = one-way only; thermistor = less resistance when hot; LDR = less resistance in light.
Worked Example: Reading the Diagram4.3.1
Problem A circuit shows a cell, a switch, and a lamp all connected in a single loop. A student adds an ammeter and a voltmeter to measure the lamp. Where does each meter go on the diagram?
Step 1 The ammeter symbol (A in a circle) goes in the loop in series with the lamp, since current is the same all the way round a single loop. The voltmeter symbol (V in a circle) goes across the lamp as a branch, in parallel, to read the p.d. delivered to it.
Series and Parallel Circuits4.3.2
Components can be wired two ways. In a series circuit everything sits in a single loop: the current is the same everywhere, the voltages of the components add up to the source e.m.f., and the total resistance is just $R_1 + R_2 + \ldots$ (resistances add). In a parallel circuit components sit on separate branches: each branch gets the same voltage, the branch currents add up to the total, and the combined resistance is less than the smallest single resistor (more paths = easier flow). Cells in series add their e.m.f.s too ($1.5$ V + $1.5$ V $= 3$ V). Series strings share one push (and all go out if one breaks); parallel branches each get the full push and work independently, which is exactly how the lights and sockets in your house are wired. 🏠
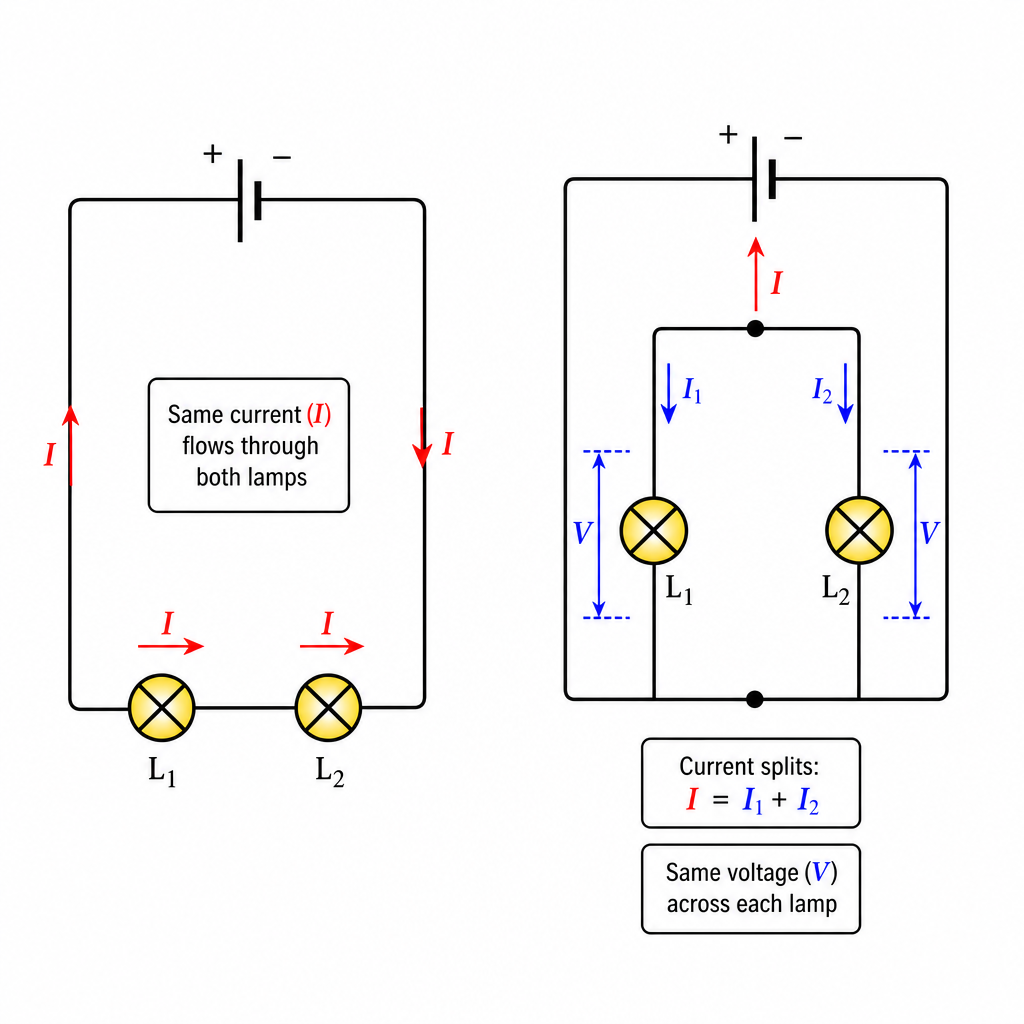
> 🔑 Key idea: Series = one loop, same current, resistances add ($R_1+R_2$). Parallel = branches, same voltage, total R less than the smallest; branch currents add.
Worked Example: Series and Parallel Resistors4.3.2
Problem A $6.0$ V battery is connected to two resistors, $R_1 = 4.0\ \Omega$ and $R_2 = 2.0\ \Omega$. Find the total resistance and the current drawn from the battery if they are connected (a) in series, then (b) work out the current through each if instead they are in parallel.
Step 1 In series, resistances add: $R_\text{total} = R_1 + R_2 = 4.0 + 2.0 = 6.0\ \Omega$.
Step 2 The current from the battery uses the total resistance: $I = \dfrac{V}{R_\text{total}} = \dfrac{6.0}{6.0} = 1.0$ A, and this same current flows through both resistors because it's a single loop.
Step 3 In parallel, each resistor gets the full $6.0$ V across it. Through $R_1$: $I_1 = \dfrac{6.0}{4.0} = 1.5$ A. Through $R_2$: $I_2 = \dfrac{6.0}{2.0} = 3.0$ A.
Step 4 The branch currents add to give the total from the battery: $I_\text{total} = 1.5 + 3.0 = 4.5$ A, far more than the series case. More parallel paths means less total resistance and more current, which is why plugging in more appliances draws more current from the mains.
Potential Dividers4.3.3
Put two resistors in series across a supply and they share the voltage between them: that's a potential divider. The bigger resistor takes the bigger share of the voltage, because in series the same current flows through both and $V = IR$ means more resistance gets more volts. Swap one resistor for a thermistor or an LDR and the divided voltage now changes automatically with temperature or light, which is the heart of simple sensor circuits (a temperature alarm, an automatic night light). At Core you just need the idea: series resistors split the supply voltage in proportion to their resistances. ⚖️
> 🔑 Key idea: Series resistors share the supply voltage; the larger resistance takes the larger share (because $V = IR$ with the same current through both).
Worked Example: Sharing the Volts4.3.3
Problem A $12$ V supply is connected across two resistors in series, $R_1 = 2.0\ \Omega$ and $R_2 = 4.0\ \Omega$. Which resistor has the larger voltage across it, and roughly how is the $12$ V split?
Step 1 Same current flows through both, so by $V = IR$ the larger resistor gets the larger voltage. $R_2$ is twice $R_1$, so it takes twice the voltage: the $12$ V splits as $4$ V across $R_1$ and $8$ V across $R_2$ (a 1 : 2 share matching the 2 : 4 resistances).
Electrical Safety at Home4.4
Mains electricity is genuinely dangerous, so a UK-style plug has three wires with fixed colours: live (brown, carries the dangerous voltage), neutral (blue, completes the circuit), and earth (green/yellow, a safety wire to the metal case). The fuse is a thin wire that melts and breaks the circuit if too big a current flows (a short circuit or a fault), cutting the power before wires overheat and start a fire. The earth wire plus fuse protects metal-cased appliances: if the live wire touches the case, a huge current flows to earth, blows the fuse, and makes the case safe. Appliances with plastic cases use double insulation instead (no earth needed), because the case can never become live. Trip switches (circuit breakers) do the fuse's job but reset with a flick instead of needing replacement. ⚠️
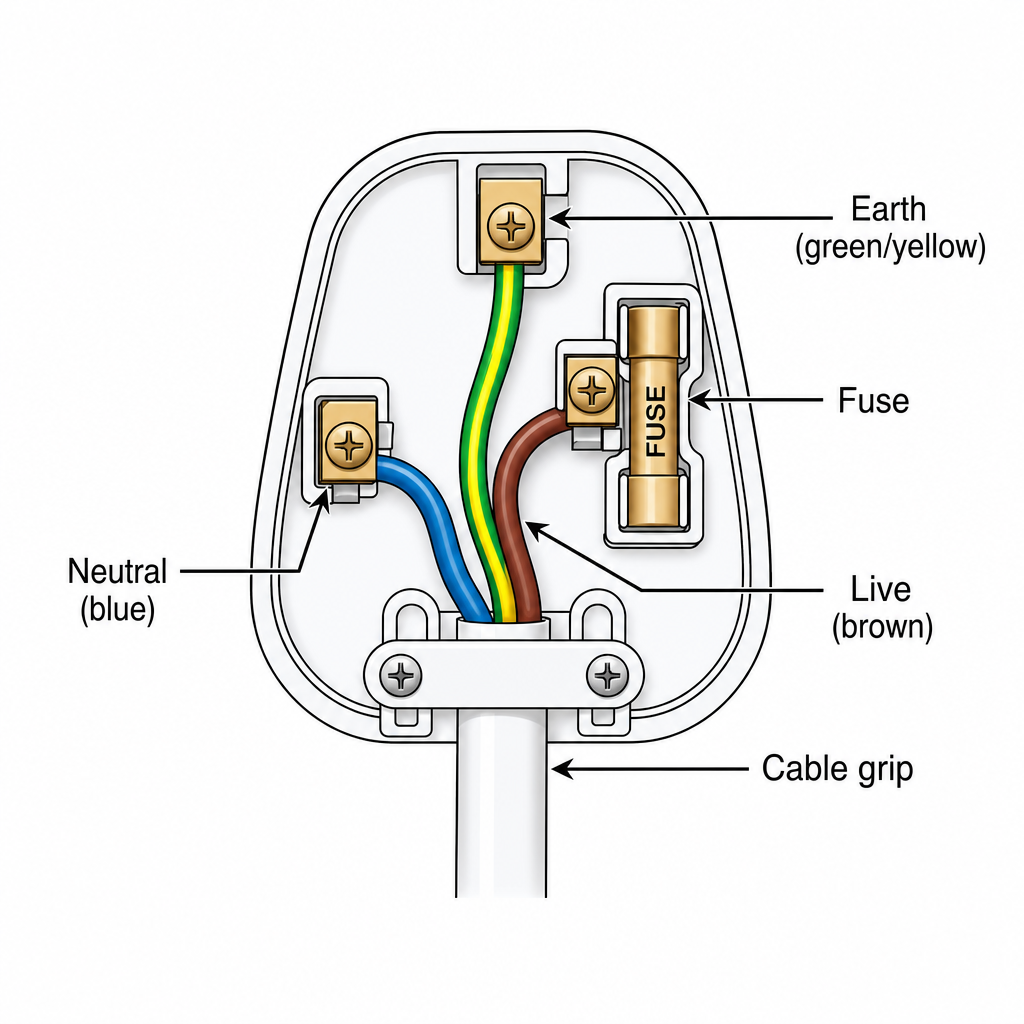
> 🔑 Key idea: Live (brown), neutral (blue), earth (green/yellow). The fuse melts to break a dangerous current; earth + fuse make metal cases safe; plastic cases use double insulation.
Worked Example: Picking the Right Fuse4.4
Problem A lamp is rated $230$ V, $60$ W. Fuses come in $3$ A and $13$ A. Which one should you fit?
Step 1 Find the normal current: $I = \dfrac{P}{V} = \dfrac{60}{230} \approx 0.26$ A. Pick the smallest fuse rated just above the normal current, so the $3$ A fuse is correct: it carries $0.26$ A fine but blows quickly on a fault. A $13$ A fuse would let a dangerous fault current flow before melting.
Electromagnetic Induction4.5.1
Here's the magic that powers the world: move a magnet near a coil of wire (or move a wire through a magnetic field) and you induce a voltage (e.m.f.) across the wire. No battery, no contact: just relative movement between a conductor and a magnetic field. If the wire is part of a complete circuit, that induced voltage drives an induced current. The induced voltage is bigger if you move the magnet faster, use a stronger magnet, or use more turns on the coil. Stop moving and the voltage vanishes: it's the change that matters. Spin a coil between magnets continuously and you get a steady supply of a.c., which is exactly how an a.c. generator and every power station on Earth makes electricity. 🌀
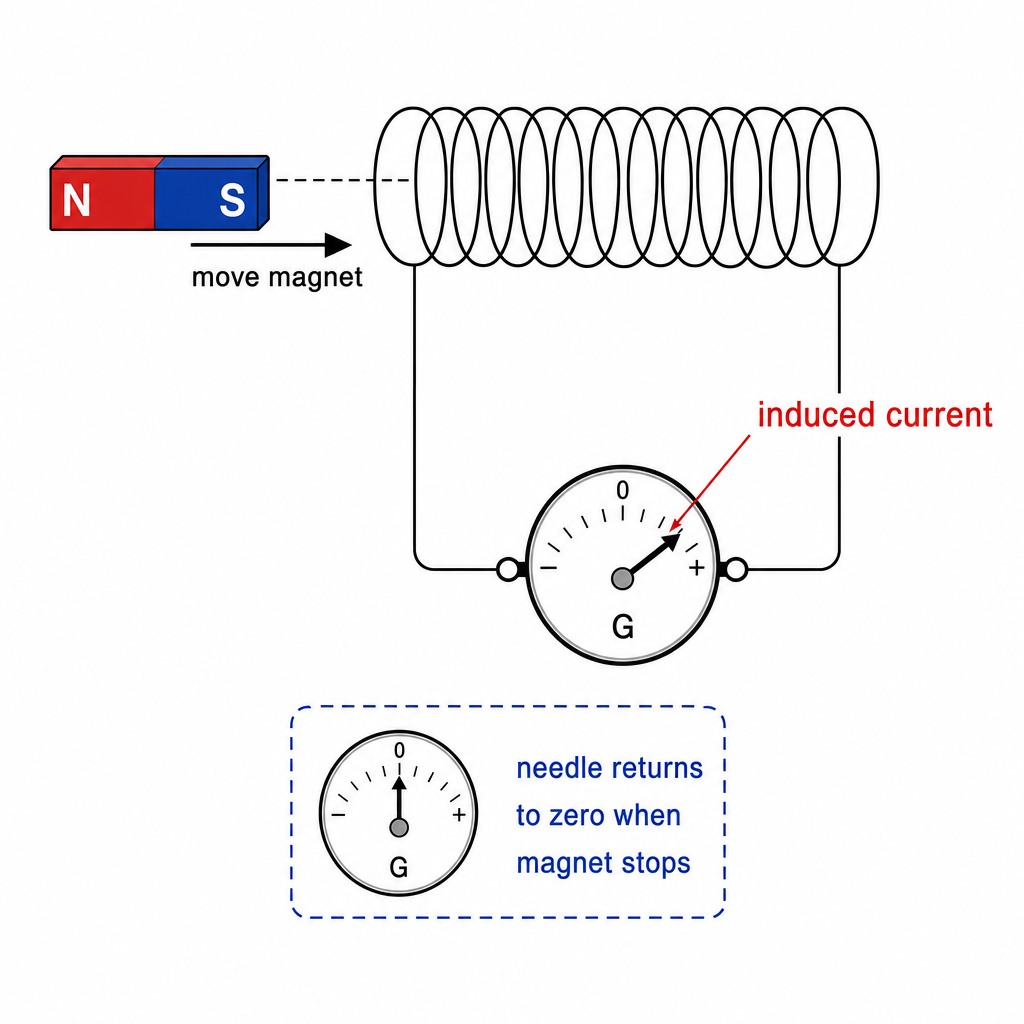
> 🔑 Key idea: Moving a magnet and coil relative to each other induces a voltage. Faster movement, stronger magnet, or more turns = bigger induced e.m.f. Stop moving → no voltage.
Worked Example: The Flicking Needle4.5.1
Problem A magnet is pushed into a coil connected to a meter; the needle flicks, then returns to zero even though the magnet is still inside. Explain why.
Step 1 A voltage is induced only while the magnetic field through the coil is changing, which happens while the magnet is moving in. Once the magnet stops, the field is steady, nothing changes, so no voltage is induced and the needle drops back to zero. Pull the magnet back out and the needle flicks the other way.
The Magnetic Effect of a Current4.5.3
It works in reverse too: an electric current creates a magnetic field around itself. A straight wire makes circular field lines around it; coil the wire into a solenoid and the field inside becomes strong and uniform, just like a bar magnet, with a north and south end. Add an iron core and you've built an electromagnet: strong when the current is on, and switchable off instantly. Make the field stronger by increasing the current, adding more turns, or using an iron core. This switchable magnetism runs relays (a small current switches a big one), electric bells, loudspeakers (current variations push a cone to make sound) and the giant electromagnets that lift cars in scrapyards. 🧲
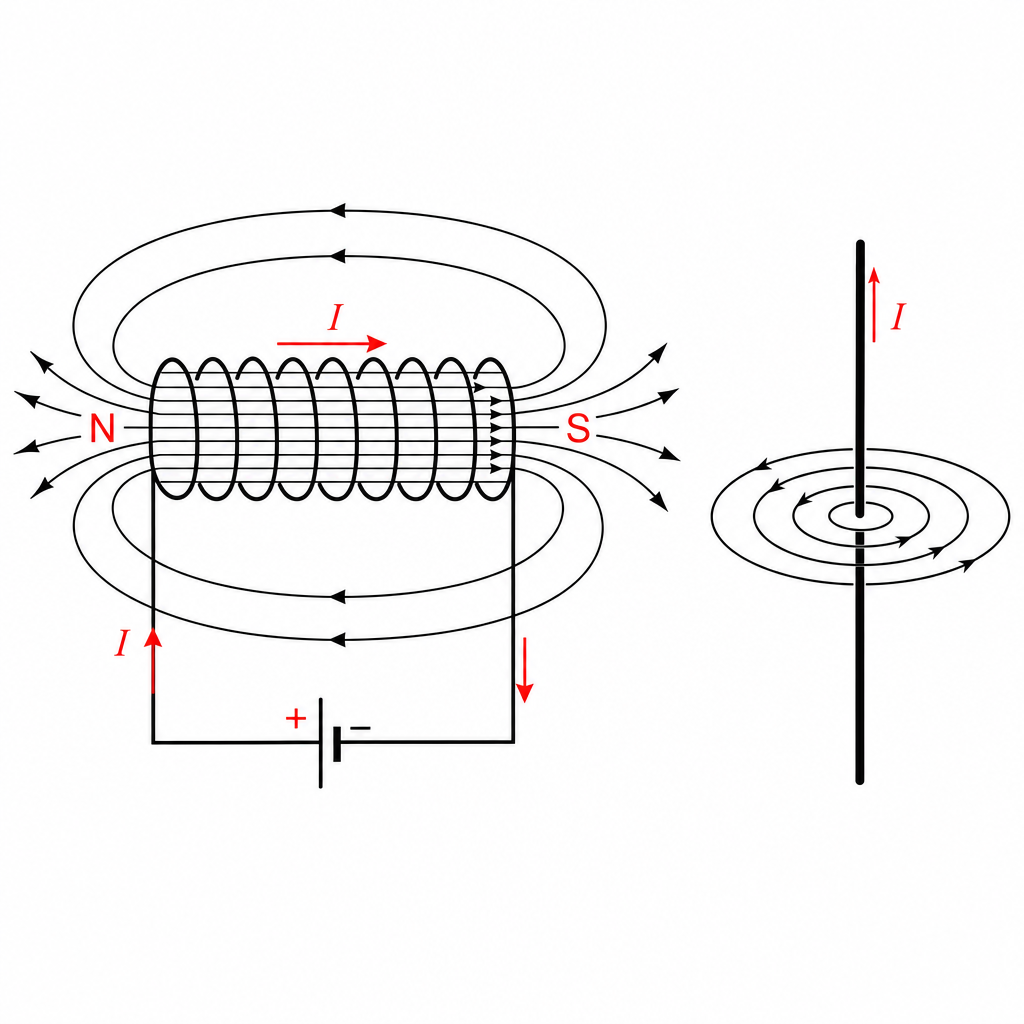
> 🔑 Key idea: A current makes a magnetic field. A solenoid acts like a bar magnet; add an iron core for a switchable electromagnet. Used in relays, bells, and loudspeakers.
Worked Example: Strengthening an Electromagnet4.5.3
Problem An electromagnet (a coil around an iron nail) lifts $5$ paper clips. State three changes that would let it lift more.
Step 1 Increase the current (more cells), add more turns to the coil, and make sure there's a soft-*iron core*. Each strengthens the magnetic field, so the electromagnet can lift more clips. Switching the current off drops them all instantly.
Force on a Current in a Magnetic Field4.5.4
When a current-carrying wire sits in a magnetic field, the wire's own field and the magnet's field interact and the wire feels a force that pushes it. This is the motor effect. The force is biggest when the wire is at right angles to the field, and you find its direction with Fleming's left-hand rule: thumb = thrust (force/motion), first finger = field (N to S), second finger = current (+ to −). Crucially, if you reverse the current or reverse the field, the force reverses direction; reverse both and it stays the same. Increase the current or use a stronger magnet and the push gets bigger. This single effect is what makes every electric motor and loudspeaker move. 💪
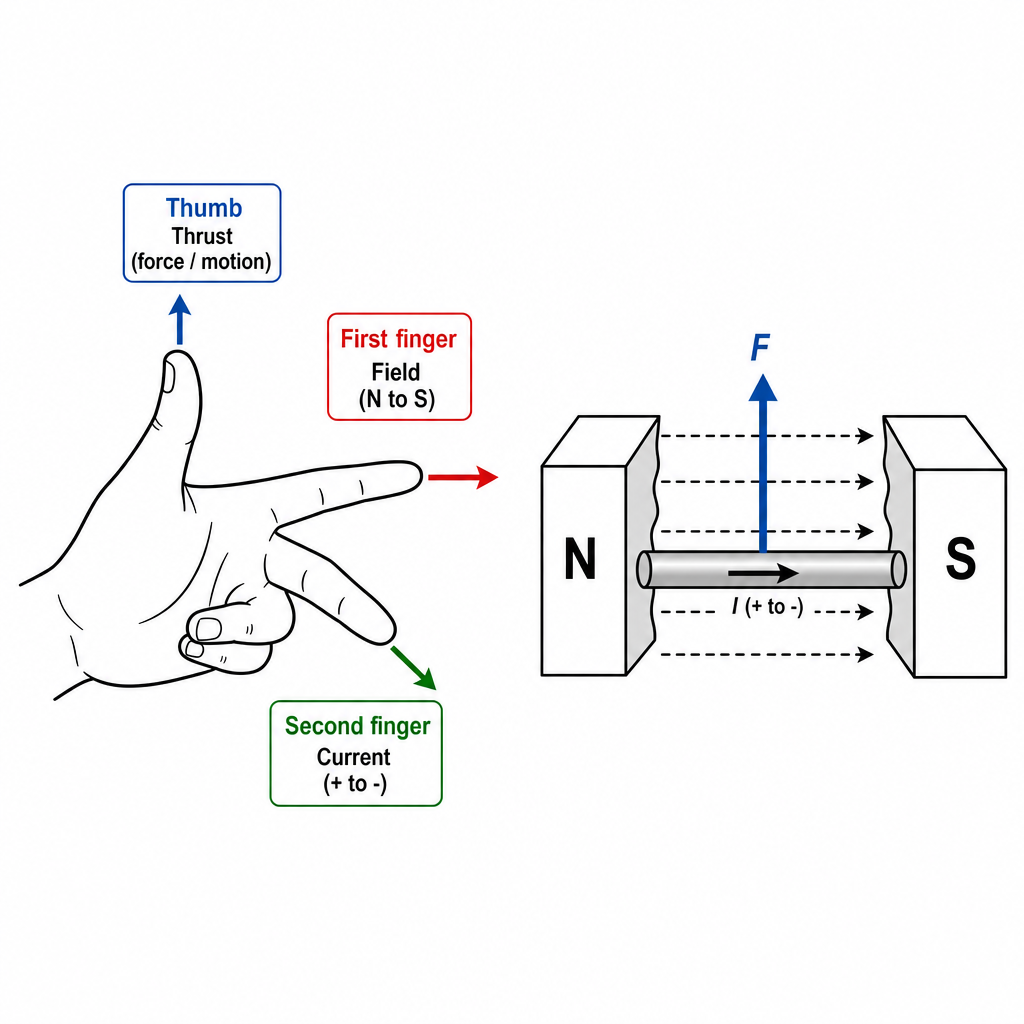
> 🔑 Key idea: A current in a magnetic field feels a force (the motor effect). Direction from Fleming's left-hand rule. Reverse the current or the field → force reverses.
Worked Example: Reversing the Push4.5.4
Problem A wire between two magnet poles jumps upward when the current flows. What happens if you reverse the battery, and what happens if you also swap the magnet poles?
Step 1 Reversing the current alone flips the force, so the wire jumps downward. If you then also swap the magnet poles, you reverse the field too, and two reversals cancel: the wire jumps upward again, just like at the start.
The d.c. Motor4.5.5
A d.c. motor turns electrical energy into continuous spinning motion using the motor effect. A coil sits between magnet poles; when current flows, one side of the coil is pushed up and the other side down (opposite force directions because the current runs opposite ways on the two sides), so the coil rotates. A clever part called the split-ring commutator swaps the current direction in the coil every half-turn, so the push keeps driving it the same way round instead of stalling. Spin it faster by increasing the current, adding more turns, or using a stronger magnet. Every fan, drill, electric car and washing machine runs on this idea. 🔄
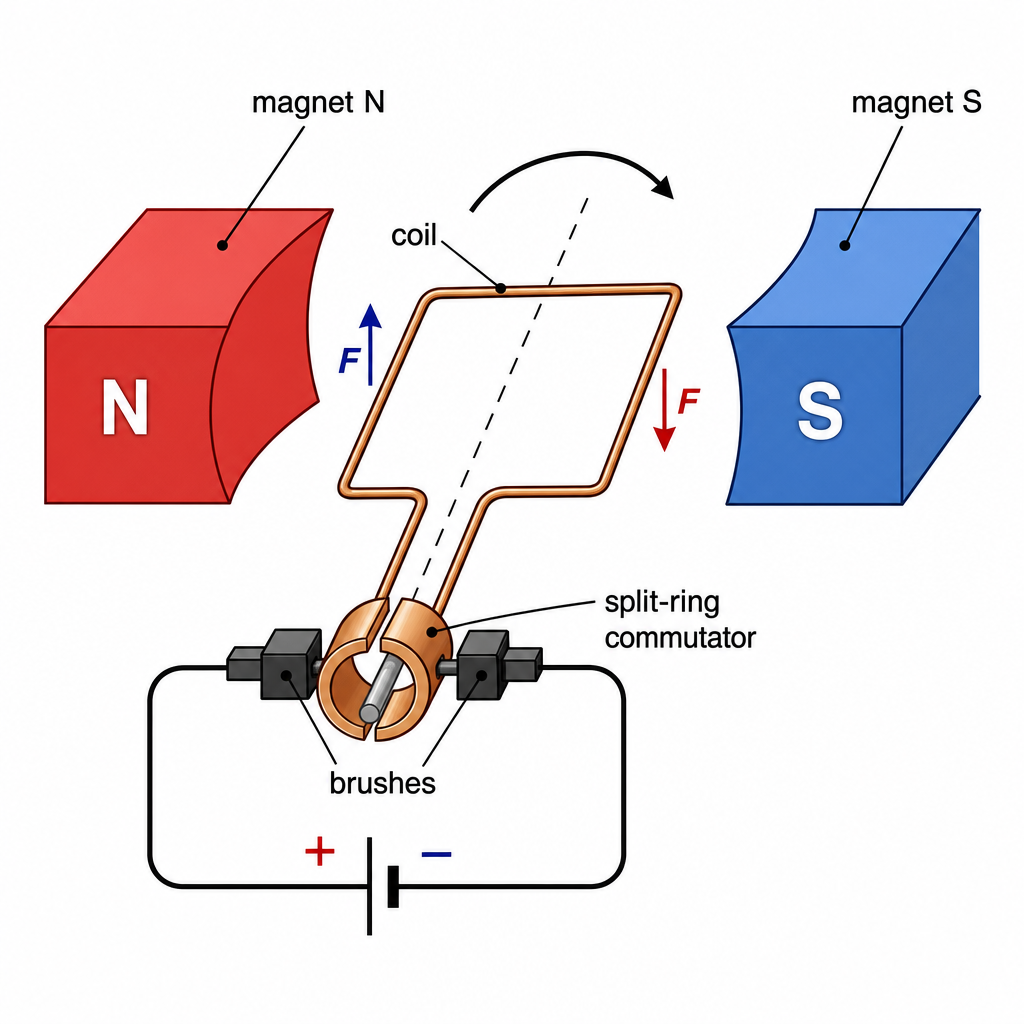
> 🔑 Key idea: A motor uses the motor effect on a coil. Opposite forces on the two sides make it spin; the split-ring commutator reverses the current each half-turn to keep it turning the same way.
Worked Example: Why the Commutator Matters4.5.5
Problem Without a split-ring commutator, a motor coil would swing round half a turn and then stop, rocking back and forth. Explain how the commutator fixes this.
Step 1 After half a turn the two sides of the coil have swapped places, so without a change the forces would now push it back. The split-ring commutator reverses the current in the coil at exactly that moment, which reverses the forces too, so the coil keeps being pushed the same way round and rotates continuously.
The Transformer4.5.6
A transformer changes the size of an a.c. voltage using two coils, a primary and a secondary, wound on a shared iron core. Alternating current in the primary makes a constantly changing magnetic field in the core, which induces an a.c. voltage in the secondary (pure electromagnetic induction, no moving parts). The voltage changes in the same ratio as the turns:
$$\frac{V_p}{V_s} = \frac{N_p}{N_s}$$
More turns on the secondary (a step-up transformer) gives a higher output voltage; fewer turns (step-down) gives a lower one. Transformers are why power is sent across the country at very high voltage: high voltage means low current for the same power, and low current wastes far less energy heating the cables. Then a step-down transformer drops it back to a safe $230$ V for your house. Note transformers only work on a.c., never d.c., because they need a changing field. ⚡
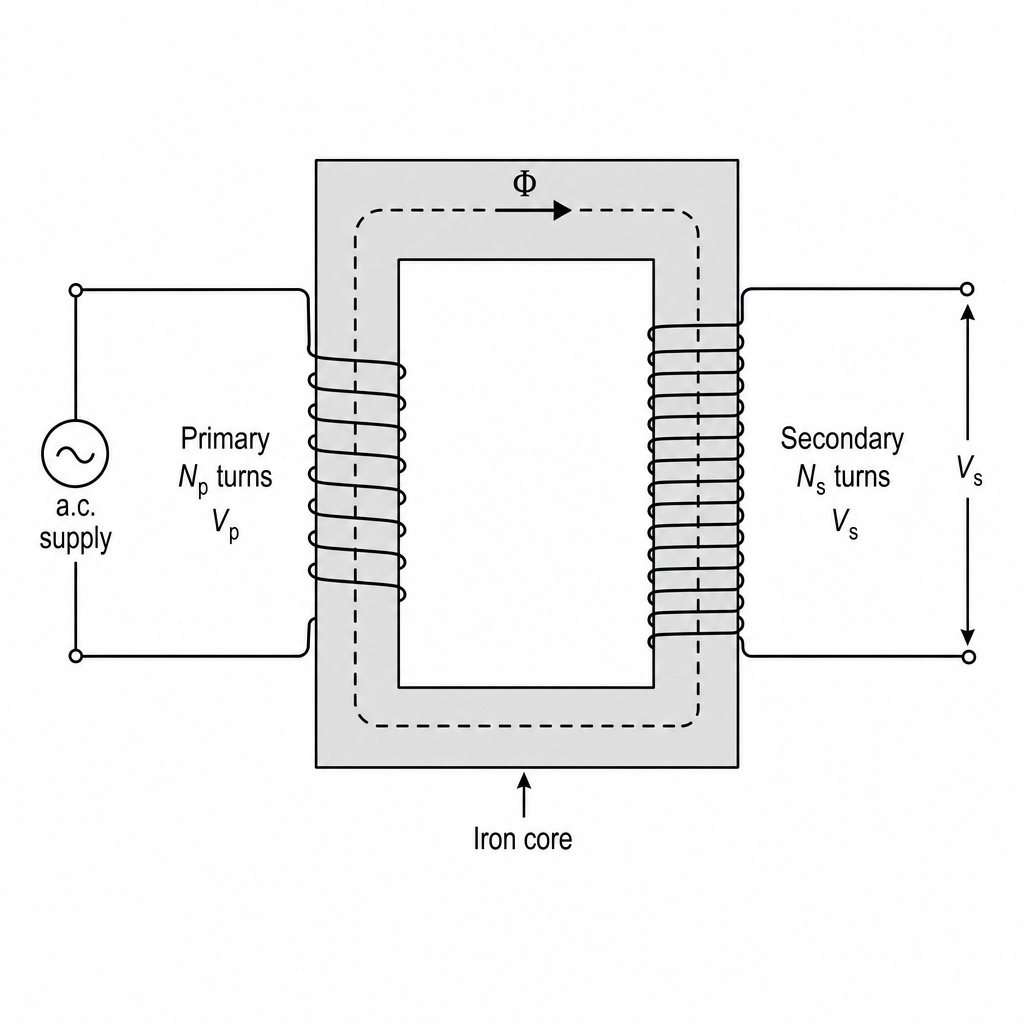
> 🔑 Key formula: $\dfrac{V_p}{V_s} = \dfrac{N_p}{N_s}$. More secondary turns = step-up; fewer = step-down. Transformers need a changing field, so a.c. only, never d.c.
Worked Example: Step-Down for the House4.5.6
Problem A step-down transformer must change $11\,500$ V from a local substation to $230$ V for homes. The primary has $5000$ turns. How many turns are on the secondary?
Step 1 Write the transformer equation and rearrange for the secondary turns: $\dfrac{V_p}{V_s} = \dfrac{N_p}{N_s}$, so $N_s = N_p \times \dfrac{V_s}{V_p}$.
Step 2 Substitute the values: $N_s = 5000 \times \dfrac{230}{11\,500} = 5000 \times 0.020 = 100$ turns.
Step 3 The secondary has just $100$ turns versus the primary's $5000$, a $50 : 1$ ratio that matches the $11\,500 : 230$ voltage ratio. Far fewer turns on the output side: that's what makes it step down.
Key Points to Remember
- Magnets: like poles repel, unlike attract; field lines run N → S outside the magnet; iron, steel, cobalt, nickel are magnetic.
- Static charge: created by friction (electrons move); like charges repel, unlike attract; conductors let charge flow, insulators trap it.
- Current $I = Q/t$ in amps (ammeter in series); conventional current flows + → −; d.c. is one-way, a.c. alternates.
- Voltage in volts (voltmeter in parallel); e.m.f. = energy given per charge by the source, p.d. = energy delivered per charge to a component.
- Resistance $R = V/I$, so $V = IR$, in ohms; longer wire → more resistance, thicker wire → less.
- Power $P = IV$ and energy $E = IVt$; bills use kilowatt-hours, cost $=$ kW $\times$ h $\times$ price.
- Series: one loop, same current, resistances add. Parallel: branches, same voltage, total resistance less than the smallest.
- Safety: live (brown), neutral (blue), earth (green/yellow); fuses and trip switches break dangerous currents; earth + fuse or double insulation protect you.
- Electromagnetic induction: moving a magnet and coil induces a voltage (faster/stronger/more turns = bigger). Basis of generators and transformers.
- Magnetic effect of a current: a current makes a magnetic field; solenoids and electromagnets run relays, bells, loudspeakers.
- Motor effect: a current in a field feels a force (Fleming's left-hand rule); reverse current or field to reverse it. Powers the d.c. motor (with its split-ring commutator).
- Transformer: $V_p/V_s = N_p/N_s$; steps voltage up or down; needs a.c.; high-voltage transmission cuts energy loss in cables.