Introduction
Quick-fire nuclear physics. Why does a smoke detector need a speck of americium, why can a scan show a tumour without surgery, how do we know a fossil is 5000 years old? Same engine every time: unstable nuclei firing out radiation at a rate nothing can speed up or slow down.
This is your fast refresh, not the full textbook. One key formula or rule per concept, one quick worked example, and the exact sentence the marker wants. Lock in nuclide notation, the half-life halving trick, and how to balance a decay equation, and this chapter pays out reliably. Let's track every A and Z. ☢️
Atomic Structure and the Nuclear ModelE5.1.1
An atom is a tiny, dense, positive nucleus (protons + neutrons) with electrons orbiting in the huge empty space around it. We know this from the alpha-scattering experiment: most alpha particles fired at thin gold foil went straight through (atoms are mostly empty), a few were deflected (the nucleus is positive), and a very few bounced almost straight back (the nucleus is tiny but massive and holds nearly all the mass).
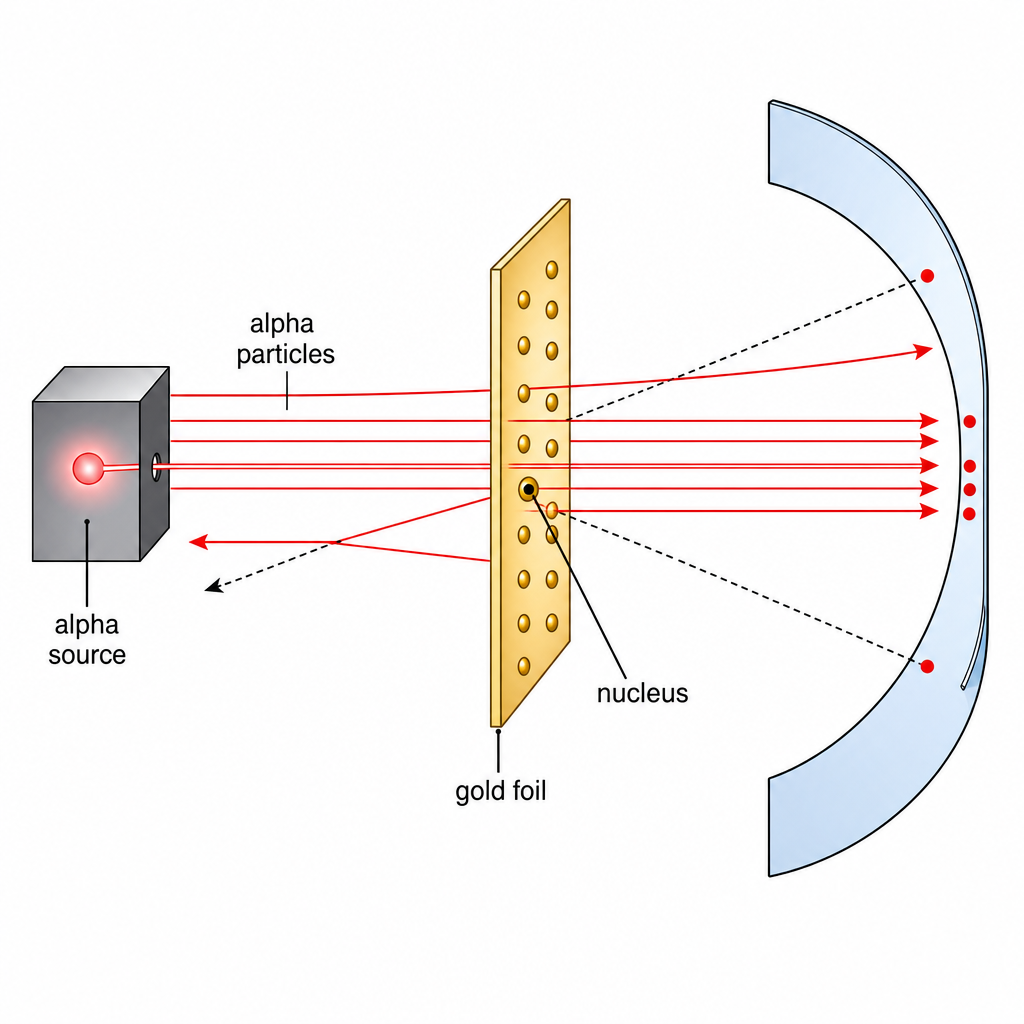
> 🔑 Key idea: Most alphas pass straight through (atom mostly empty); a tiny few rebound (nucleus is small, dense, positive, holds almost all the mass). Lose an electron → positive ion; gain one → negative ion.
Worked Example: Why a Few Alphas Bounced Straight BackE5.1.1
Problem In the gold-foil experiment, why did only about 1 in 8000 alpha particles bounce back through more than 90°?
Step 1 A head-on rebound needs the alpha to hit something tiny, positive and far heavier than itself. The nucleus is all three, but it occupies a minute fraction of the atom's volume, so a direct hit is rare. The vast majority of alphas miss it entirely and sail through the empty space, which is why deflections that large are so uncommon.
The Nucleus, Isotopes and Nuclide NotationE5.1.2
Write any nuclide as $^{A}_{Z}X$: Z = proton number (which element), A = nucleon number (protons + neutrons), so neutrons = A − Z. Isotopes are atoms of the same element (same Z) with different numbers of neutrons (different A). Splitting a large nucleus is fission; joining two small nuclei is fusion (the Sun's power source). In every nuclear change the totals of A and Z are conserved.
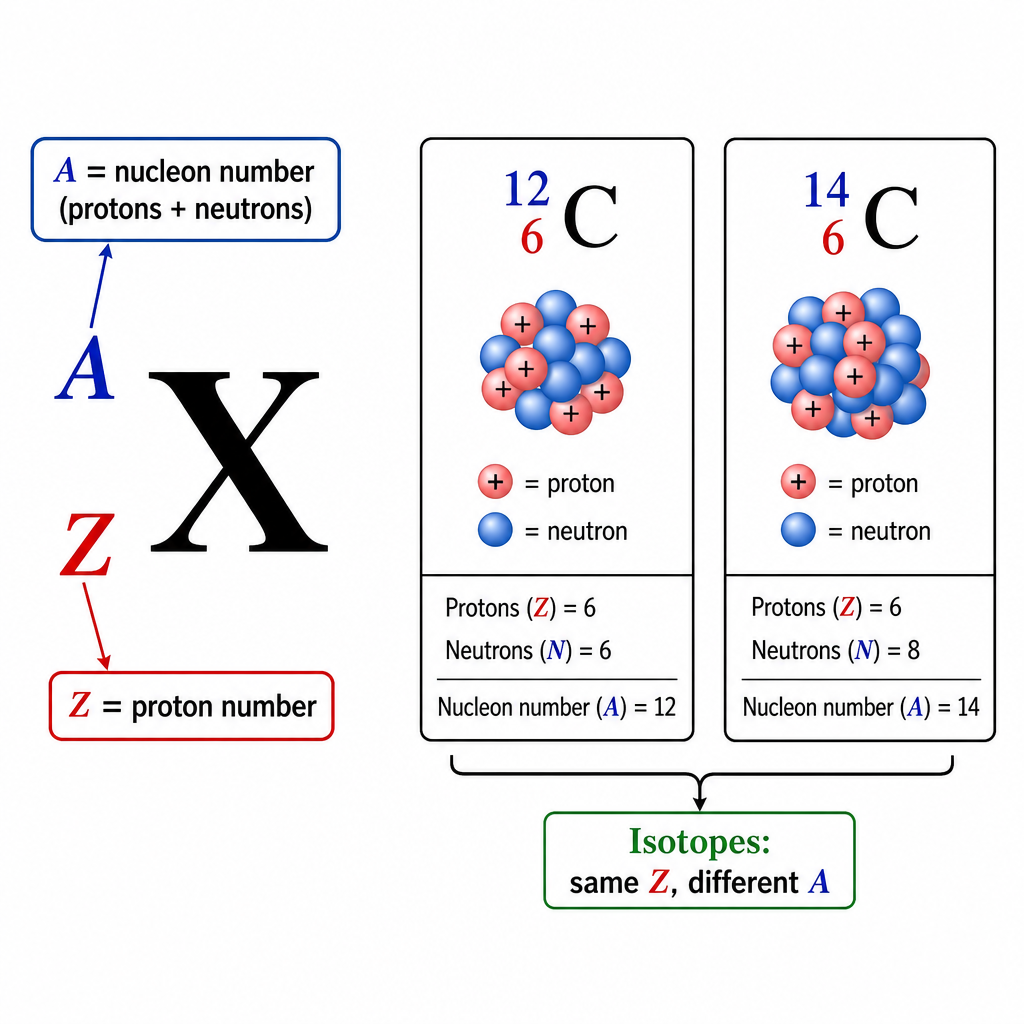
> 🔑 Key formula: $^{A}_{Z}X$ with $\text{neutrons} = A - Z$. Isotopes share Z, differ in A. Fission splits, fusion joins; A and Z totals are always conserved.
Worked Example: Neutrons in Uranium-235E5.1.2
Problem How many neutrons are in a nucleus of $^{235}_{92}\text{U}$, and how does it differ from $^{238}_{92}\text{U}$?
Step 1 Neutrons $= A - Z = 235 - 92 = 143$. The other isotope has $238 - 92 = 146$ neutrons. Both are uranium (same $Z = 92$), so they are isotopes differing by 3 neutrons.
Detection of RadioactivityE5.2.1
A Geiger-Müller (GM) tube clicks once per ionising particle that enters it, giving a count rate. But some counts come from background radiation that is always present (radon gas, rocks, cosmic rays, medical sources). To measure a source fairly you record the background rate with no source, then subtract it: corrected count rate = measured rate − background rate.
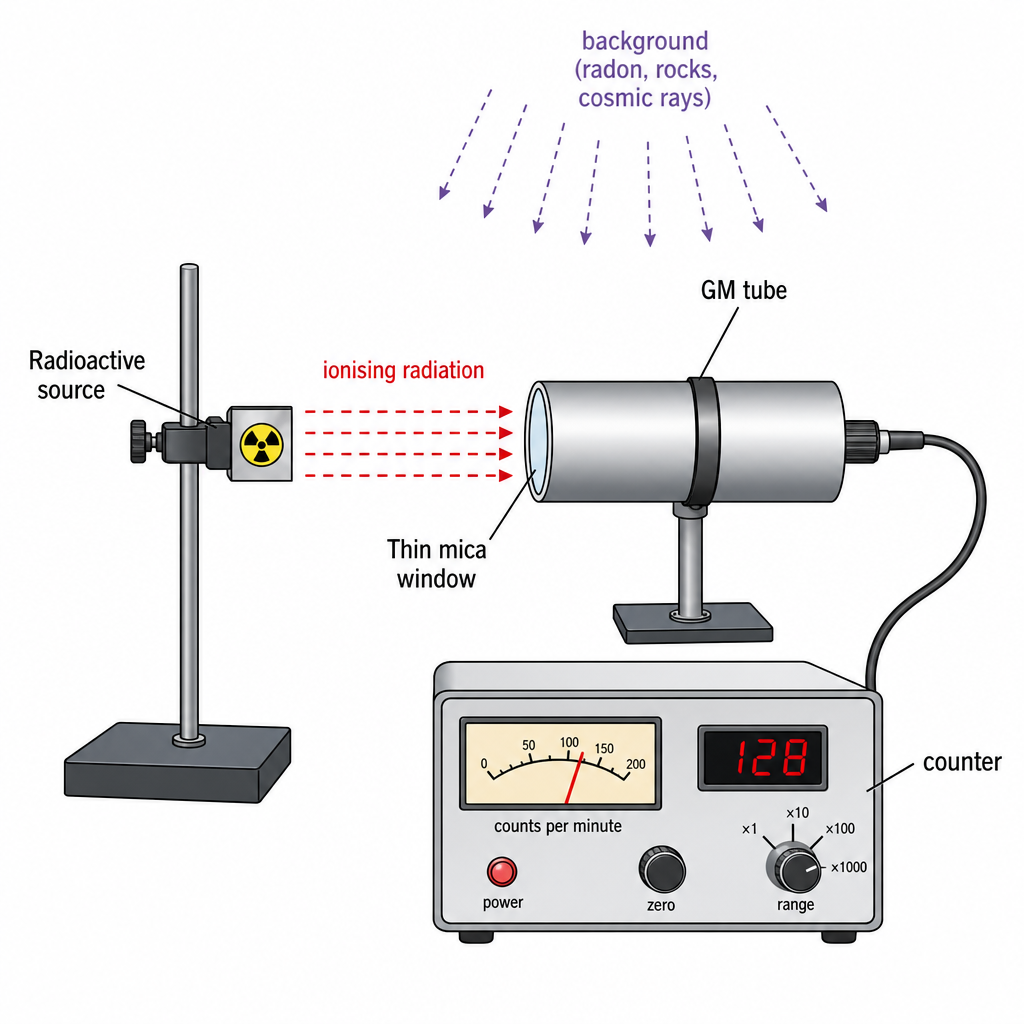
> 🔑 Key idea: Always measure and subtract background first. Corrected count rate = measured − background. Background is random, low, and everywhere.
Worked Example: Corrected Count RateE5.2.1
Problem A GM tube reads 312 counts/min with a source nearby and 24 counts/min with the source removed. What is the corrected count rate from the source?
Step 1 Corrected rate $= 312 - 24 = 288$ counts/min. The 24 counts/min is background and must always be subtracted before quoting a source's activity.
Alpha, Beta and Gamma EmissionE5.2.2
Three radiations, ranked by ionising power (high → low) and penetration (low → high). Alpha (α) = a helium nucleus $^{4}_{2}\text{He}$: highly ionising, heavy, slow, stopped by paper or a few cm of air. Beta (β) = a fast electron $^{\ \ 0}_{-1}\text{e}$: medium ionising, stopped by a few mm of aluminium. Gamma (γ) = a high-energy EM wave: weakly ionising, very penetrating, only reduced by thick lead or concrete. Because α and β are charged, they deflect in electric and magnetic fields (opposite ways); γ, being uncharged, does not.
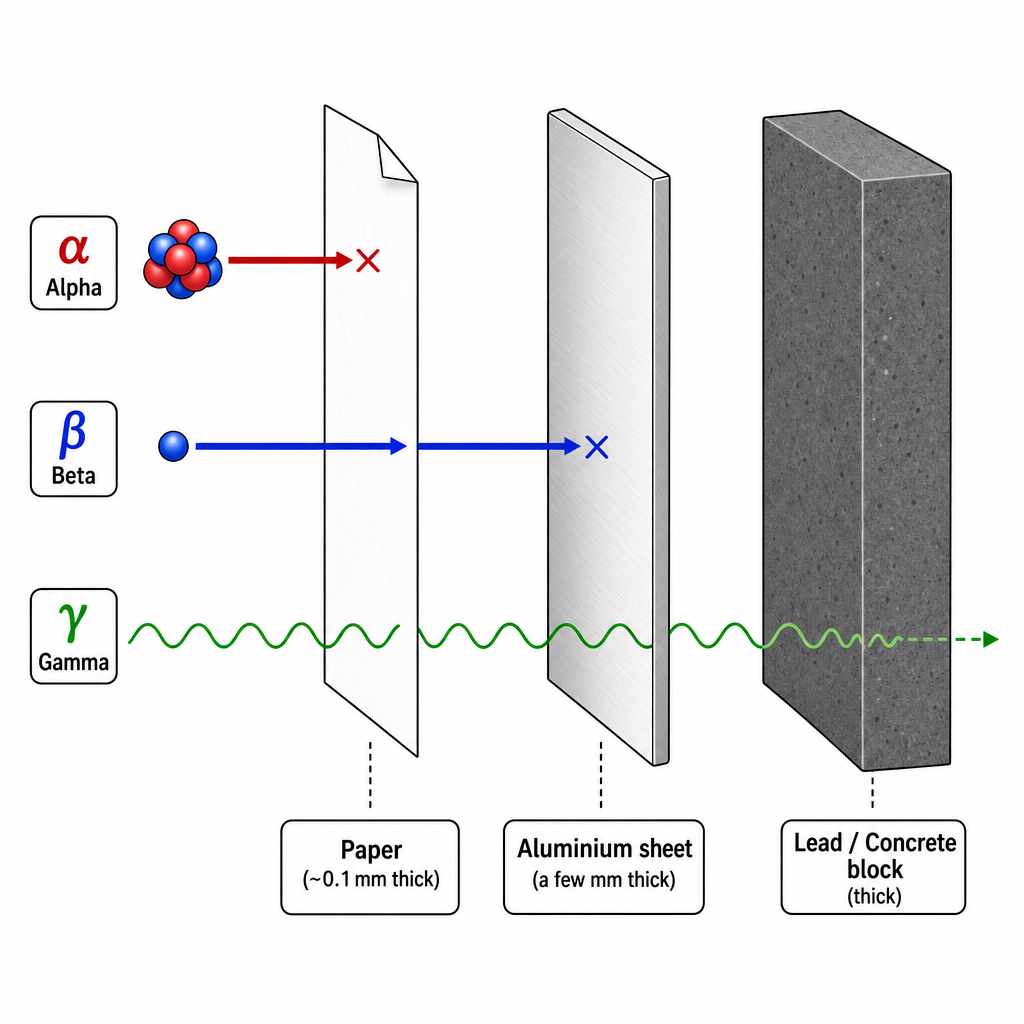
> 🔑 Key idea: α = $^{4}_{2}\text{He}$, stopped by paper, most ionising. β = electron, stopped by aluminium. γ = EM wave, needs lead. Charge order: α positive, β negative, γ neutral — so α and β bend opposite ways in a field, γ goes straight.
Worked Example: Which Shield Stops Which?E5.2.2
Problem A source is tested behind (a) nothing, (b) paper, (c) 5 mm aluminium. The count rate falls a little after paper, falls a lot more after aluminium, but never reaches background. Which radiations are present?
Step 1 Paper removing some counts means alpha is present (only α is stopped by paper). The big drop at aluminium means beta is present too (β is stopped by a few mm of aluminium).
Step 2 The rate never falling to background means something still gets through aluminium: gamma is present as well. So the source emits all three — α, β and γ. The trick is always to read each absorber as removing exactly one type.
Radioactive Decay EquationsE5.2.3
Radioactive decay is spontaneous and random: you cannot predict which nucleus decays next, and nothing (heat, pressure, chemistry) changes the rate. Write the change as a nuclide equation that balances A and Z on both sides. Alpha decay: A drops by 4, Z by 2. Beta-minus decay: a neutron becomes a proton plus an emitted electron, so Z rises by 1 while A is unchanged. Gamma emission carries away energy only, changing neither A nor Z.
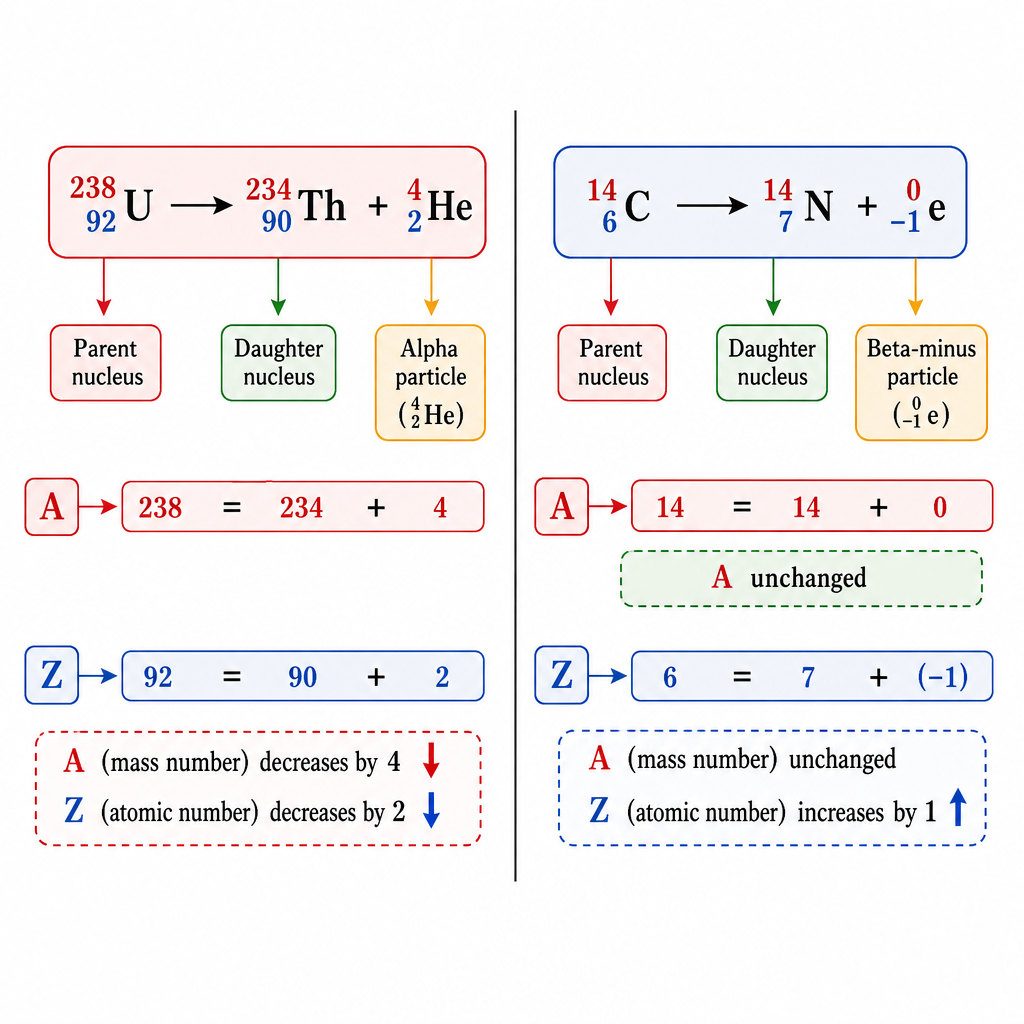
> 🔑 Key formula: α: $^{A}_{Z}X \rightarrow\ ^{A-4}_{Z-2}Y +\ ^{4}_{2}\text{He}$. β⁻: $^{A}_{Z}X \rightarrow\ ^{\ A}_{Z+1}Y +\ ^{\ \ 0}_{-1}\text{e}$. γ: no change to A or Z. Balance the top row (A) and the bottom row (Z) separately.
Worked Example: Balance an Alpha and a Beta DecayE5.2.3
Problem (a) Radium-226 ($^{226}_{88}\text{Ra}$) emits an alpha particle. (b) The resulting nucleus later emits a beta-minus particle. Find both daughter nuclei.
Step 1 Alpha decay: subtract 4 from A and 2 from Z. $226 - 4 = 222$, $88 - 2 = 86$, giving $^{222}_{86}\text{Rn}$ (radon). Check: $226 = 222 + 4$ and $88 = 86 + 2$. ✓
Step 2 Beta-minus decay of $^{222}_{86}\text{Rn}$: A stays the same, Z rises by 1. $A = 222$, $Z = 86 + 1 = 87$, giving $^{222}_{87}\text{Fr}$ (francium). Check the bottom row: $86 = 87 + (-1)$. ✓ Balancing A and Z separately gives the new element every time.
Half-lifeE5.2.4
The half-life $T_{1/2}$ is the time for half the undecayed nuclei (or half the activity) to decay. After $n$ half-lives the fraction remaining is $\left(\tfrac{1}{2}\right)^{n}$. Decay is random, so this is a statistical average over huge numbers of nuclei. Half-life choice matters in applications: a smoke alarm needs a long-lived source (steady for years), a medical tracer needs a short one (gone soon after the scan).
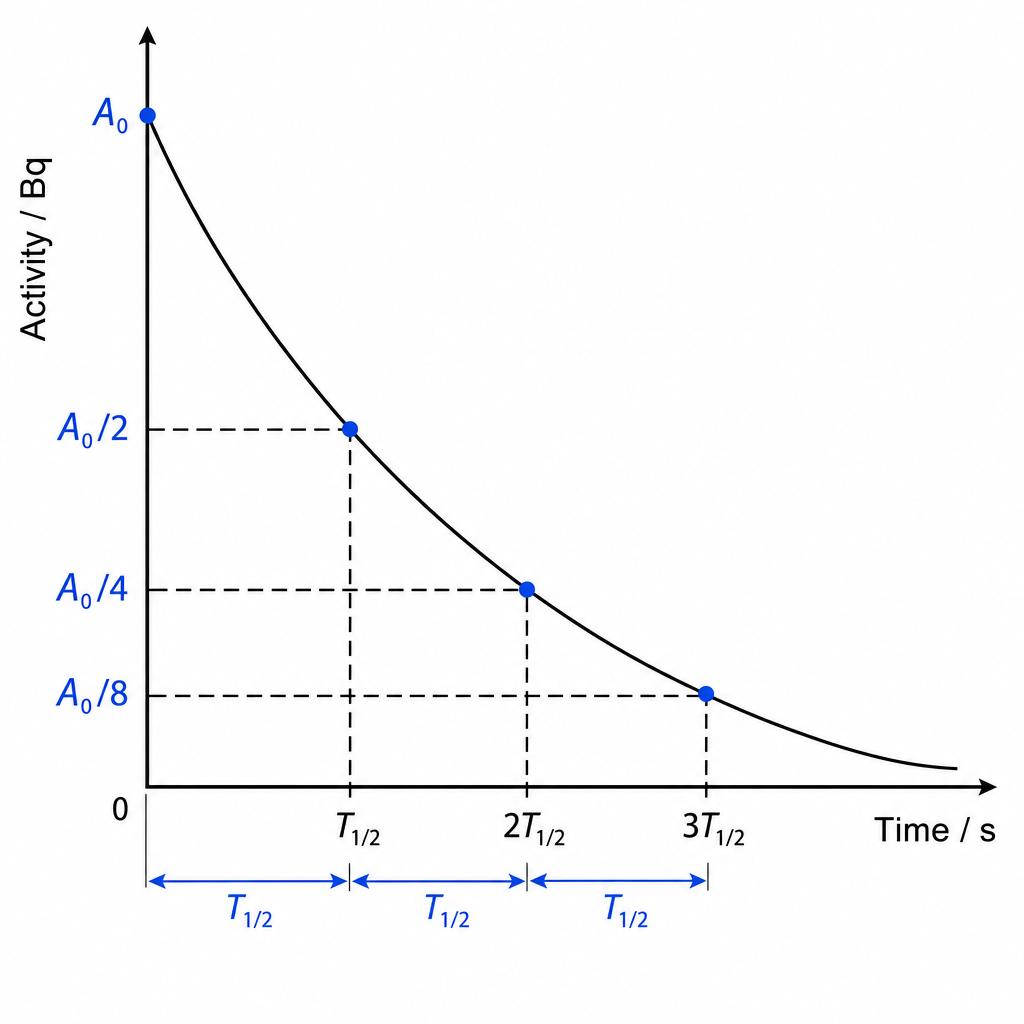
> 🔑 Key formula: Fraction left after $n$ half-lives $= \left(\tfrac{1}{2}\right)^{n}$, where $n = \dfrac{\text{time elapsed}}{T_{1/2}}$. Works for count rate, activity, mass or number of nuclei.
Worked Example: Fraction Remaining After Three Half-livesE5.2.4
Problem A source has activity 800 Bq and a half-life of 6 hours. What is its activity after 18 hours, and what fraction of the original remains?
Step 1 Count the half-lives: $n = \dfrac{18}{6} = 3$.
Step 2 Halve three times: $800 \rightarrow 400 \rightarrow 200 \rightarrow 100$ Bq. The fraction remaining is $\left(\tfrac{1}{2}\right)^{3} = \tfrac{1}{8}$, and $\tfrac{1}{8} \times 800 = 100$ Bq. Sanity check: more half-lives means less left, and $100$ Bq is one-eighth of $800$. ✓
Radiation SafetyE5.2.5
Ionising radiation damages living cells (it can kill them or trigger cancer-causing mutations), so handlers minimise their dose using three levers: time (spend less time near the source), distance (move further away — intensity falls steeply with distance), and shielding (put lead, concrete or thick walls between you and the source). Sources are stored in lead-lined boxes and handled with tongs, never bare hands.
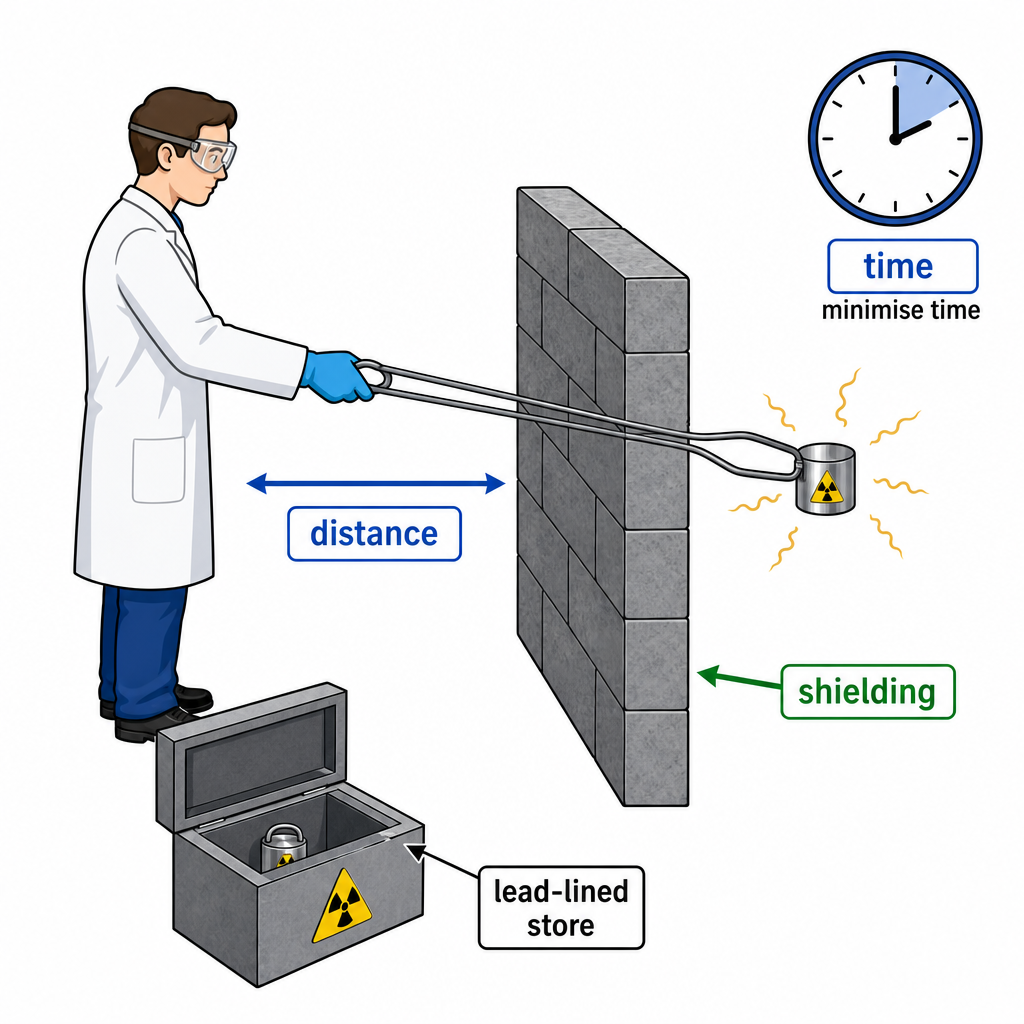
> 🔑 Key idea: Cut your dose with time, distance and shielding. Store sources in lead, handle with tongs, keep them pointed away from people.
Worked Example: Protecting a Lab TechnicianE5.2.5
Problem A technician must move a gamma source from its store to an experiment. State three precautions that reduce the dose received.
Step 1 Use distance (handle the source with long tongs, not fingers), time (move it quickly and don't linger), and shielding (keep it behind a lead screen and return it to its lead-lined box straight after). All three levers reduce the absorbed dose.
Key Points to Remember
- An atom is a tiny dense positive nucleus (protons + neutrons) in mostly empty space; alpha-scattering proved it. Lose/gain an electron → ion.
- Nuclide notation $^{A}_{Z}X$: neutrons $= A - Z$. Isotopes share Z, differ in A. Fission splits, fusion joins; A and Z totals are conserved.
- Detection: a GM tube gives a count rate; always subtract the ever-present background to get the corrected count rate.
- α = $^{4}_{2}\text{He}$ (stopped by paper, most ionising), β = electron (stopped by aluminium), γ = EM wave (needs lead). Charged α and β deflect oppositely in fields; γ does not.
- Decay is spontaneous and random and unaffected by temperature/pressure. Balance A and Z: α drops A by 4 and Z by 2; β⁻ raises Z by 1 (a neutron → proton + electron); γ changes neither.
- Half-life $T_{1/2}$: fraction left after $n$ half-lives is $\left(\tfrac{1}{2}\right)^{n}$ with $n = \text{time}/T_{1/2}$.
- Lower your dose with time, distance and shielding; store sources in lead and handle with tongs.